
When I made my first DIY woven baby wrap carrier, I decided that I didn't want to dye it (at least not right away). Part of my reasoning was that the baby was already born and ready to be worn when I made my first wrap, and I was antsy to get started wrapping him, and partially it seemed a little daunting... so I just kept my wrap natural. I've worn my baby in a "natty" wrap for the past five plus months, and I love that wrap. The one thing that's not ideal about my natural wrap is that it's hard to tell which rail is which, so learning new carries requires extra close attention, and tightening can be a little tricky sometimes, too.
When my sister in law mentioned that she might like me to make a woven wrap for her, though, I decided it was a perfect opportunity to do some experimenting with dye. I asked her if she'd prefer a certain color, and when she said she'd maybe like pink, I fell down the rabbit hole of different dye colors and methods and I neglected all my responsibilities doing research.
So, after lots of research and planning, I decided to go with a gradient (or "grad") dye, rail to rail.
Basically, gradient dye results in an ombre sort of look, with one section a darker color, gradually moving to a lighter color. You get it. I didn't want to babysit my dye too much, so I chose to use the siphon method.
For this project, I chose Rose Red by Dharma Dye-- it felt like a more "sophisticated" pink, without being too purply.
A Note About Dye:
Because babies constantly put stuff in their mouths, you can't use just any dye for a baby carrier.
Fiber reactive dyes (like Dharma's Procion dyes) are colorfast and bond to the fibers themselves, so a baby sucking on a dyed wrap isn't going to be consuming dye. It's important to get the right kind of dye to keep your baby safe. Do your research before buying dye.
Another Note:
This is my very first dyed baby wrap, and my very first grad dye-- so the way I did it might not be the easiest/best way. I did a lot of reading, so I'm pretty confident that I did it "right," but I'd suggest you do a bunch of reading, too. A GREAT and super helpful resource to me was the Facebook group Dyed Baby Carriers. The files there are super duper helpful-- lots of tutorials. Highly recommended.
*This post contains affiliate links*
Materials:
GlovesFace Mask
Dye Container (I used a 13 gallon black plastic garbage can)
Siphon Container (I used a smaller beige plastic garbage can)
Mixing Containers (I used three gallon-sized ice cream tubs)
Tubing (I used two old Medela breast pump tubes-- which will NEVER be used with a breast pump again)
Soda Ash or Washing Soda (I used washing soda, I used about 17 cups or so)
Salt (I used about 13 cups)
Water
Fiber Reactive Dye (I used Dharma Trading's Procion Rose Red color)
Hangers
Clothespins
Tension Rod
A Stool/Stand/Table... something to set the siphon container on
Osnaburg Wrap (scoured, cut, hemmed)-- yes, an osnaburg wrap HAS TO BE SCOURED. Click here for instructions on scouring -- see step #2. You can also do this method with a different type of wrap, but do your research about the fiber content of your wrap and adjust this tutorial accordingly.
STEPS:
1) Washing Soda Soak
Washing soda or soda ash are vital to the dye process-- they help the dye bond with the fiber. The first step is to get the wrap good and full of washing soda.
I mixed one cup of washing soda with one gallon of water, then poured it over top of my fabric in my siphon container. I used about four gallons of that mixture to completely cover my wrap, then weighted the wrap down a bit, and left it to soak. I came back and mixed it up using a thick wood yard stick a couple times, about every fifteen minutes or so. It's recommended to soak a half hour... I got busy, so I ended up soaking mine for about an hour and a half.
In the washing machine, spin it until just damp (do not rinse!!).
2) Hang
I hung my fabric in double layers, pinning it to the hangers with clothespins. At first I was really particular about getting it perfectly even... but after a couple frustrating attempts, I just decided to go with the flow. It's art, not science.
I realized pretty quickly that my hangers were flimsy for this job... so my husband suggested using rubber bands to counteract the droopiness. If you use better hangers (plastic, maybe, instead of these stupid wire ones), this step might be a little less headache inducing.
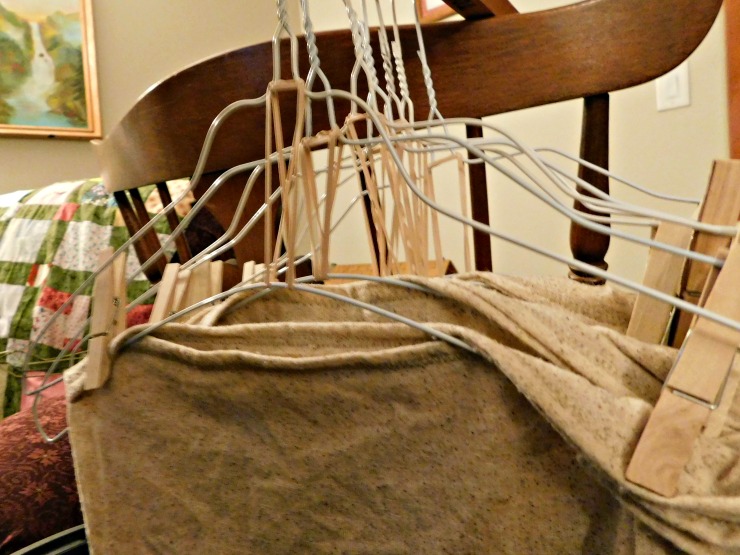
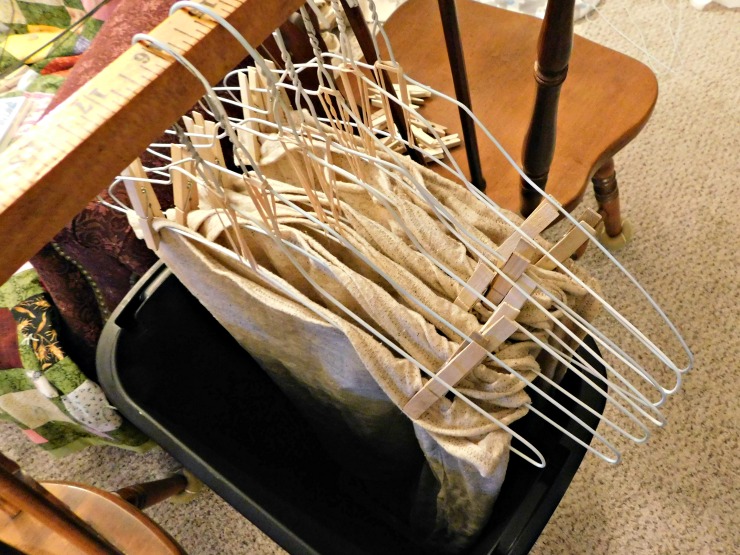
Having two people working together on this part really made it much easier. The washing soda on the wrap kind of irritated my hands, so I wore gloves for this part.
I actually hung my fabric the night before I did the dyeing-- the fabric was mostly dry by the next morning. I don't know if/how that affected the results, but that's what worked best for our schedule, so hey.
3) Practice the Siphon
The siphon method works for a grad dye in two ways-- first, it slowly raises the level of the dye so that more of the wrap is in the dye bath; secondly, it dilutes the dye bath gradually. A little water is always being added to the dye bath.
Setting up the siphon is a little tricky, so I tested out the siphon using just plain water first (I recommend that big time).
The water needs to get from the siphon container to the dye container via the tubing. You'll want the tubes to stay as low as possible in the siphon container. I used two clothespins and a mug-- I pinned the tubing to the sides of the mug to keep the ends sunk in the container.
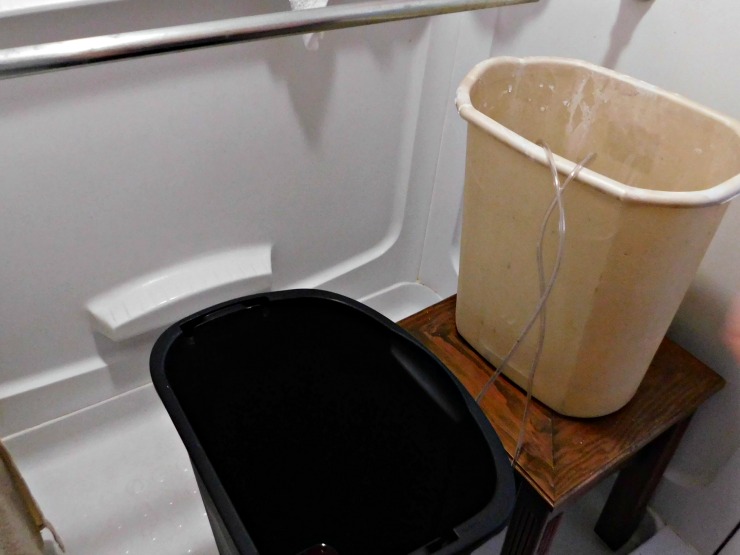
It's also important to remember that gravity has a big effect here. The siphon container should be higher than the dye container-- the water level in the dye container will only go to the same height as the bottom of your siphon container.
While practicing the siphon, I timed the transfer rate so I knew how long it would take to siphon a gallon of water. In my experience, it took about 10 minutes per gallon.
So, I knew I wanted to start out with at least 3 gallons in the siphon container so I didn't have to mess with it for about a half hour.
4) Measure and Prepare Dye Bath Water Mixture
I started by measuring my ingredients. Per one gallon of water, I needed one cup of salt and half a cup of washing soda. I measured the salt and soda into one-gallon ice cream containers so they were ready to go.

5) Set Up Fabric and Prepare to Dye!
Then I had my husband set up a tension rod in the shower. I put my hangers on the tension rod. The rod needs to be high enough so that the bottom of the wrap doesn't touch the bottom of the dye container. I set my siphon container on a small table and put the tubing in place.
Next, I got my dye ready. In a small mug, I measured three tablespoons powdered dye. I added a small amount of warm water and mixed until the dye was dissolved.

6) Pour in the Dye
I filled one of my gallon ice cream buckets (with the salt and soda ash ready) with hot water and stirred it well. Then I carefully poured the dye from the mug into the bottom of the empty black garbage can (dye container) and used the water mixture to rinse out the cup.
I poured the whole gallon of the water mixture into the bottom of the dye container.
7) Start the Siphon
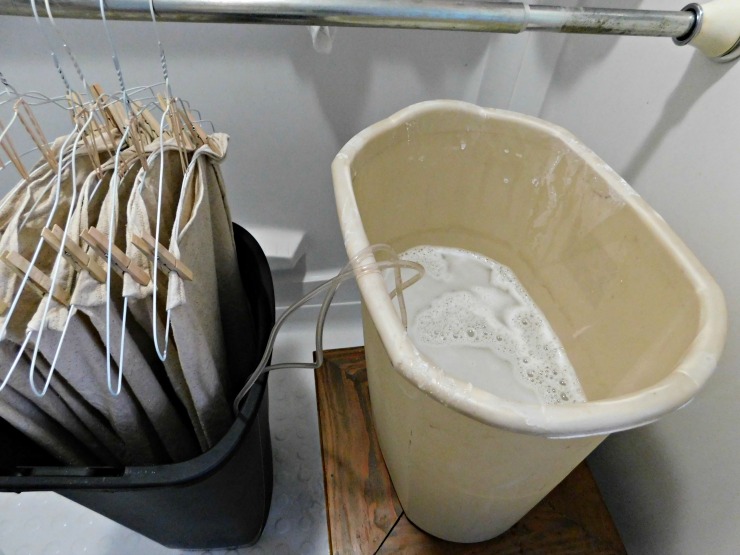
I mixed hot water into the two other prepped ice cream buckets, stirring to dissolve the salt and washing soda, and put them into the siphon container. I carefully placed the end of the hanging wrap into the dye container, then started the siphon going.
8) Wait and Fill
Now the water/washing soda/salt mixture was slowly trickling through the siphon into the dye container. I prepped my ice cream buckets again (one cup salt, half cup washing soda), and waited.
When the siphon container had about a gallon of water remaining (so, after about ten minutes), I filled my prepped ice cream buckets with hot water, stirred well, and added them carefully to the siphon container.
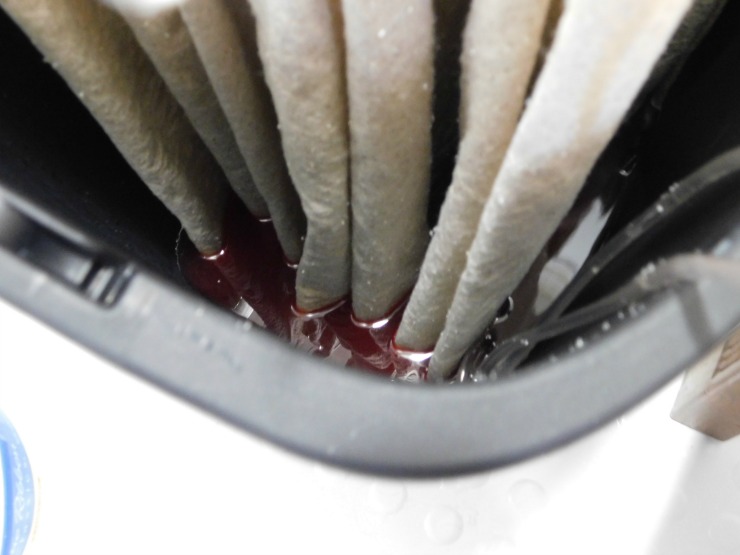
And so on and so forth.
Wait and fill, wait and fill.

And if you're anything like me, this step will result in salt ALL OVER the floor as you refill the ice cream buckets...
9) Final Dunk
My dye container wasn't quite tall enough to fit the entire width of my wrap. We removed the hangers from the tension rod and slowly dunked the remaining fabric in the dye bath.

When we pulled it out, it looked like this--

I didn't like that distinct line-- you can really see where the siphon process stopped... so we set the hangers on top of the dye container for about three minutes to make the change more gradual.

Look at how pretty!!

10) Batch
For this wrap, I "batched" the wrap- I put a plastic bag over top of the wrap and used a space heater to keep it warm. Batching is used for some types of dye methods, but after I did this step, I learned that I didn't have to batch it after all! So. I am adding this step in just for my own memory of exactly how I did this particular wrap, but go ahead and skip on down to #11.
11) Rinse
Using my shower's removable sprayer, I sprayed cold water all over the wrap. I did this for about ten or fifteen minutes, I'd say, then squeezed out the excess water and tossed it in the washing machine.
I used cold water and a large load setting to fill the washer, then let the washer agitate a few times and then let the wrap sit overnight in the washing machine. In the morning, I did three full washes with just water. You might not need as many-- just keep checking the water in the machine to see if the dye is still bleeding out of the wrap or not. When the water ran clear, I added a couple drops of Dawn dish detergent to help any remaining dye loosen and did another wash... and after that, I did one final wash with a little detergent, and then dried the wrap in my dryer.
12) Wrap!
And it's done!

Now comes the really fun part-- actually using the wrap!!
Wraps can be really stiff at first- both DIY and commercial wraps need a while to get broken in. The best way to break in a wrap is just to wrap with it, but you can also speed up the process by braiding, steam ironing, running through rings, sitting on it...
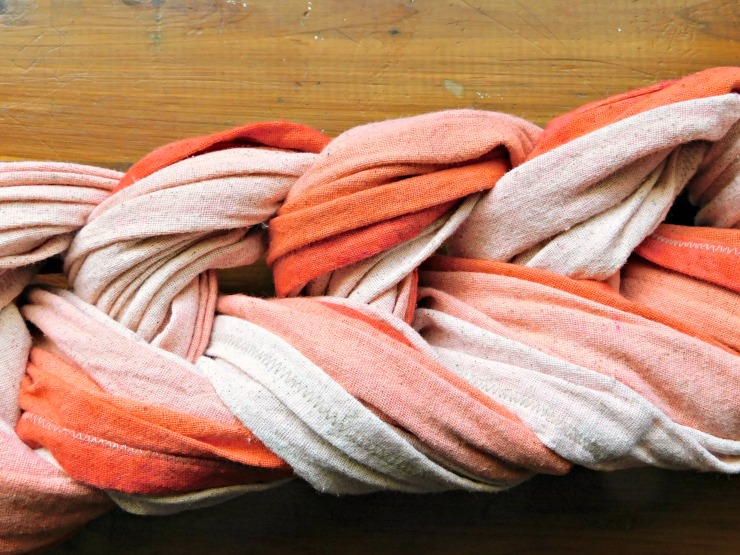
But the best way to break in a wrap is just to use it. This wrap was going to be gifted to my sister in law, but we wrapped with it a couple times to help get it a little more cuddly before we went it off.
My boy looks pretty good in pink, I must say.
The Aftermath:
Okay, so here are some things I learned and things I'd do differently next time...
More Dye. I was worried about the wrap coming out too dark. I didn't want the darker rail to be red-red, but just a deep pink... so I only used 3 tablespoons of dye instead of the recommended 4 tablespoons. I do like how the color turned out, but more dye would have made a brighter wrap all together, so I think I'd use all 4 tablespoons next time.

More Movement. There are also a couple lighter areas on the wrap where the dye didn't penetrate as deeply. I think this is because the wrap got kind of bunched together in certain spots on the hanger... separating the layers and moving the fabric a little more during the dye process may have helped that.
Gradient Dye Siphon Method Pros:
-Doesn't require a lot of dye (with the color I used, I really only needed 2 tablespoons of dye per pound of fabric, or 4 tablespoons total)
-Passive water addition due to siphon-- it's nice not to have to sit next to the dye bath and add a little water every minute, like in other methods of grad dyes
-Finished product looks cool
-Finished product has two different colored rails (nice for wrapping, especially for beginners)
Gradient Dye Siphon Method Cons:
-Uses LOTS of salt and LOTS of washing soda
-Complicated set up
-Can be a little tricky to get a smooth gradient, even with constant passive water addition
-Dumping out the large amount of dye bath after the dye was complete was a pain (and kind of messy!
All in all, I think it was a pretty successful first try (and first dye!) and I love seeing the pictures of my little niece being worn in this pretty pink wrap!
Now that the dye bug has bitten me, I'm going to have to try out another style of dye-- so stay tuned for my next project!
RELATED POSTS:
 |
DISCLOSURE: In order for me to support my blogging habit, I may receive monetary compensation or other types of remuneration for my endorsement, recommendation, testimonial and/or link to any products or services from this blog. You may see a full disclosure by clicking on my "About" page. I will only promote products that I use, enjoy, or take a shine to. All opinions and reviews are my own and are not influenced by any compensation I may receive.


This is really adorable. I was thinking of a wrap as clothing, but I see it is for carrying a wee one! This makes me love it even more. When washing, do you have to take any special care?
ReplyDeleteNope, nothing special! Thats the nice thing about osnaburg- it's very easy care. And it does take a while to get all the extra dye rinsed out, but once you do, there's no bleeding of dye at all.
Delete